Hardware in the Loop
Hardware In The Loop (HITL) simulation is a way to test an embedded system (the real hardware and software) by simulating its environment, ie. sensor inputs, and comparing its output, ie. actuator outputs, to expected output values. It is the closest to an actual flight without actually flying.
Principle
While the SITL simulation executes the airborne code on the ground host, HITL is a way to run the autopilot code on the actual hardware in an environment where sensors and actuators are simulated. The difference is shown in diagrams below: SITL generates the physical behavior of the airplane from the Flight DynaMics (FDM) Block, then feeds the generated values into virtual sensors, the sensor inputs are processed in the autopilot and the autopilot control ouputs are captured and fed back into the FDM. HITL does the same, except it communicates with the autopilot over serial ports.
In HITL, two separate processes are involved:
The real autopilot code on the control board with its own IO (for example battery voltage, etc);
A flight model combined with a model of the actuators and the sensors.
Commands computed by the autopilot are sent to the flight model which sends back simulated values of the sensors output.
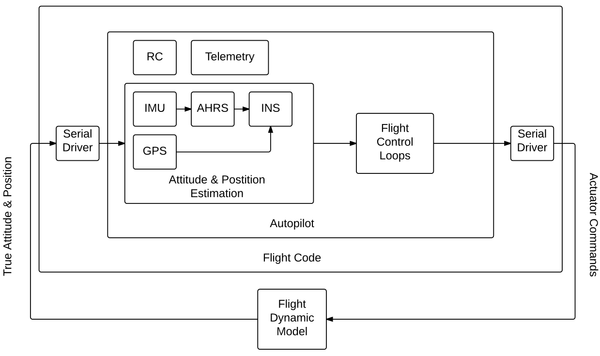
Hardware-in-the-loop (HITL) autopilot testing block diagram

Software-in-the-loop (SITL) autopilot testing block diagram
Limitations
For practical reasons (it is very difficult to simulate SPI/I2C devices such as accelerometer, gyroscope etc.), Paparazzi HITL simulates sensors and sends them through a dedicated link (independent of the telemetry link). It is thus recommanded to use the usb_serial driver or if not available a serial link with high baudrate.
Another consideration is the bandwidth of the system - the sensor data and the actuator values have to be send/received at PERIODIC_FREQUENCY (between 40-512 Hz) for HITL to work correctly. Not all communication links and frequencies are feasible without introducing latency or bandwidth saturation.
As an example, for rotorcraft with a periodic frequency of 500 Hz with default settings:
HITL_IMUmessage (45 bytes) comes at 500 HzHITL_GPSmessage (42 bytes) comes at 10 HzHITL_AIR_DATAmessage (26 bytes) comes at 50 Hz
Total bandwidth is 24220 bytes/s. A standard UART has 10 bits per bytes, so a baudrate of at least 242200 is required. To give enough margins and reduce latency, the default baudrate is set to 921600. A USB serial, even at low speed, has a baudrate of more than 1 Mb/s.
When to use SITL and when HITL?
The advantage of SITL is that it is easy to deploy and test, because no additional hardware is needed. This means that simulation is very self-contained. Ideally use for testing flight plans, or initial tuning of airframes. SITL can run faster than real time.
HITL is the simulation closest to real flight, because both the hardware and the code are identical to the set being used in real flight the autopilot is really flying with artificial sensor data. HITL is used to test the flight hardware, once the flight plan and initial tuning has been configured. Usually HITL is the last thing to run before going flying.
Prerequisites
Warning
some recommendations may not apply, in particular if real USB is used instead of UART or UART-USB bridge
HITL currently (Ubuntu 16.04) needs the following two steps to run correctly:
set rtpriority for the uart threads detailes here by adding these two lines to your
/etc/security/limits.conffile:
domain       type    item     value
$USER       soft    rtprio   100
$USER       hard    rtprio   100
where $USER is your username
install pyserial package (needed for SBUS Fakerator), typically with
sudo install pyserial.
Configuration
Warning
HITL support as changed in version 6.3, older procedure (especially described in the wiki, no longer applies
HITL can currently run on any that has:
Serial port (at high speed) or USB for sending commands and receiving sensor data
Other serial/io for regular telemetry, RC input etc.
Note that HITL is timing sensitive (at 512Hz you need to receive, process, and send data every ~2ms).
Examples are provided based on the Matek H7 Slim: conf/airframes/examples/matek_h7_fixedwing_hitl.xml and conf/airframes/examples/matek_h7_rotorcraft_hitl.xml
The airframe needs to contain:
sensors_hitlmodule in main firmware sectionactuators_hitlmodule in main firmware sectiona specific HITL firmware section
<firmware name="generic_hitl">...</firmware>that contains anhitltarget with the selected FDM and the modulenps_hitl_sensors
Warning
an ariframe file configured for HITL simulation can usually also be used with normal SITL simulation, but is not compatible with normal ap target as the sensors and actuators drivers are replaced by simulation modules
Modules in main firmware section
Here is an example of configuration for fixedwing or rotorcraft using an USB link (alternate debug link, primary usb_serial is used for telemetry):
<configure name="HITL_PORT" value="usb_serial_debug"/>
<configure name="USE_HARD_FAULT_RECOVERY" value="FALSE"/>
<module name="sensors" type="hitl">
  <define name="USE_BATTERY_MONITOR"/>
</module>
<module name="actuators" type="hitl"/>
It is preferable to disable the hard fault recovery mode for HITL.
Since the sensors data received are IMU, GPS and barometer data, any internal INS/AHRS filter compatible with your airframe should work.
HITL Target
Add an extra firmware and an hitl target in your airfame config file:
<firmware name="generic_hitl">
  <target name="hitl" board="pc">
    <module name="fdm" type="jsbsim"/>
    <module name="nps" type="hitl_sensors">
      <define name="AP_DEV" value="/dev/ttyACM1" type="string"/>
    </module>
  </target>
</firmware>
We have to specify the FDM for the HITL simulation. We recommend JSBSim, but any FDM that NPS supports should work (because NPS is the backend for HITL).
AP_DEV correcponds to the serial link which is used to have a direct communication with the autopilot and exchange commands and data. It as to match the one selected on the airborne side (usb_serial_debug in example above).
Running
Once you have your setup completed:
Clean, compile and upload the hitl target. This target will build at the same time the ap target and the ground part for simulation. It is also possible to build separately the AP and then HITL but it is not recommended.
Choose
HITL demosession and Execute
Note
If you want to use your own session, you have to pass -t hitl flag into sw/simulator/pprzsim-launch to start in HITL mode.
Have a look at the HITL USB-serual@57600 session for example, or add this to your own:
Similar steps work for rotorcraft.
FlightGear
We strongly recommend running HITL with FlightGear for visualization. The steps are the same as when running NPS targets, please refer for documentation there.
Issues
If you find a problem that is not mentioned here, please contact out gitter channel or file an issue on github.
Known issues:
setschedparam failed error
If you get “setschedparam failed!” error when running NPS/HITL, you have to change limits.conf - see https://stackoverflow.com/q/10704983/9237888
In short, edit your /etc/security/limits.conf file and add these lines at the bottom:
domain       type    item     value
YOUR_USERNAME       soft    rtprio   100
YOUR_USERNAME       hard    rtprio   100
Then I believe you have to restart your computer in order for limits to refresh.
Happy flying!